프로젝트에서
게임에 물이나 눈 등의 발자국 또는 케릭터의 이동에 반응하는 지형을 만들어야한다는 요청이 있었습니다.
Our team was asked for water or snow to interact with the player's movements or footprints in the game.
간단히 노멀이나 하이트맵정도를 띄워 제작하려했으나 실제 물이 출렁이는 느낌으로 제작해달라는 요청을 받아 발자국이나 케릭터 이동에 반응하는 물을 제작하게 되었다.
first try simply solve using 'normal' or 'height texture' , but artists said "we need ripple like real water"
so we trying interacting water creation
해결해야 할 항목들을 나열해보면
Here is a list of issues that need to be solved.
1. 물의 출렁임을 표현할 방법
1. How to express the swell of water(like wave)
2. 게임내 케릭터의 위치를 전달해줄 방법
2. How to expose the location of the game character to the material
3. 디자이너가 물의 상태 나 재질(점성 파동의 강도 등)을 설정할수 있는 방법
3. the way of changing status or materials of water's surface( riple's power / viscosity)
물의 출렁임 자체를 표현하는 아이디어는 생각보다 간단합니다.
in face the simply idea expressinon of water's wave
머터리얼로 물결의 파동성을 제작하고(vertex offset)파동이 발생하는 이벤트를 받기만 하면 됩니다.
all we had to do is write functional of ripple's wave function on materials(using vertex offset ..) and just received event of location in real game world
참고 사이트/ refrence site
https://www.raywenderlich.com/6314-creating-interactive-grass-in-unreal-engine-4
Creating Interactive Grass in Unreal Engine 4
In this Unreal Engine 4 tutorial, you will learn how to create interactive grass by using a scene capture and particles to create a vector field.
www.raywenderlich.com
https://www.raywenderlich.com/5760-creating-snow-trails-in-unreal-engine-4
Creating Snow Trails in Unreal Engine 4
In this Unreal Engine 4 tutorial, you will learn how to create deformable snow trails using a scene capture and render targets
www.raywenderlich.com
이제 우리는 아래의 그림을 따라 필요한 시스템을 제작하면서 물 표면 표현을 진행하게 되었습니다.
Now you have created the necessary system along the image and created the expression of the water surface.
완성된 결과는 아래와 같습니다.
It was ressult

파티클을 케릭터의 위치에 만들어줍니다.
Crafting particle at character's location
파티클을 바운딩 박스 내부에 들어온 케릭터나 몬스터의 발밑에 위치해 줍니다.
(들어오는 몬스터나 케릭터의 위치를 직접 수집하는 것보다 클라이언트의 도움을 받는것이 쉽습니다)
Crafting particle at character and monster's location in boundingbox area(by c++ or client code)

위 그림은 전체적으로 캡쳐와 파티클을 포함하고 있는 액터가 어떤일을 하는지를 보여줍니다.
일단 클라이언트에서 바운딩박스 안의 케릭터 및 몬스터의 위치배열을 받습니다.
배열의 갯수만큼 파티클을 생성해준후 각 배열의 위치에 그 파티클을 배치하고 캡쳐 카메라로 그 파티클을 찍는것이 기본구조입니다.
(A ) 액터는 캡쳐카메라와 파티클을 생성하는 부분을 포함하고 있습니다.
(A ) actor had scene capture and particle creater
이 액터에서 로케이션 배열을 게임 시스템으로부터 받아야합니다.
It was received location array from game system(c++)

다음은 정해진 위치에 파티클을 생성해줍니다.
Next step is particle crafting
약간 특이한점은 플레이어와 그외(몬스터등..)를 분리했습니다. - 퍼포먼스문제로 메인플레이어는 좀더 많은 표현을 하기위함
The specific point is to separate the player from others (such as monsters).
3번 예외처리등 별로 중요하지 않지만 각자 프로젝트에 맞춰 해줘야할 부분
End line(3 - prepare next tick event) is not important things

이제 틱마다 정확한 위치에 파티클을 위치시킵니다.
Now we locating at correct position the created particles per tick time
그리고 상황에 맞춰 꺼주거나(죽거나 이동이 없거나), 켜주거나(새로 물지역에 들어오거나), 이동시켜주면됩니다
And sometimes we have to deactivate or recreate(monster hove no move or deathed) as compared locations previous tick time and current tick
또한 디버그를 동해서 각 프로젝트에 맞는 예외 처리를 해줘야 합니다.
Also, through debug you should handle exceptions need for your project .

이 그림은 위에 과정을 마친 결과입니다
This image is result about end of previous step
각 케릭터는 파티클을 갖고 있습니다.
Each characters in water area have particle
( a) 액터는 그 파티클을 캡쳐합니다
And capture actor(A) capture the particles

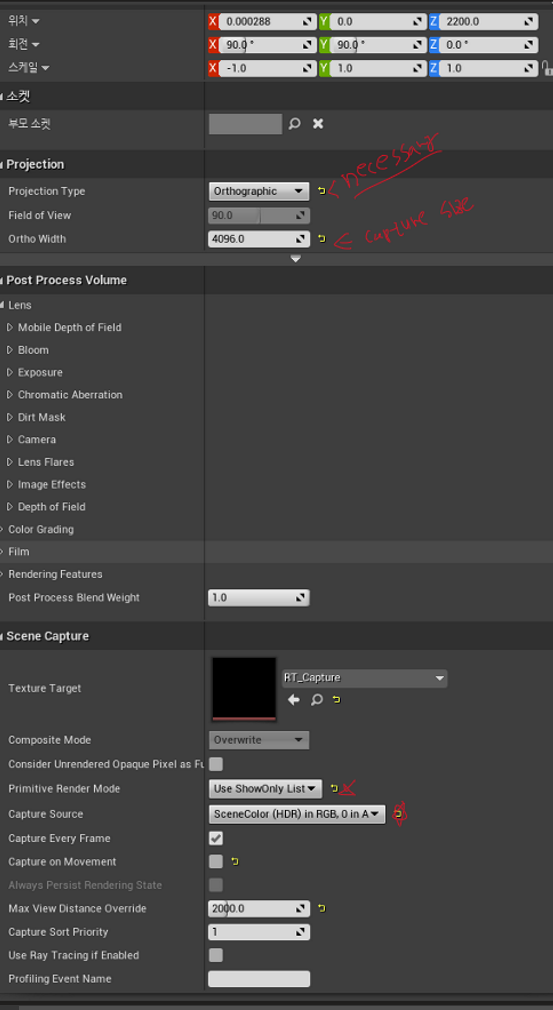
캡쳐컴포넌트세팅 오소 범위가 캡춰되는 사이즈입니다.
(A) capture actoe's capture2d conponent setting
그리고 쇼온니 리스트를 사용해서 필요한 파티클만 캡쳐하게됩니다.
이제 마지막으로 두개의 머터리얼을 작성합니다.
At last, we write 2 materials
각 입자에 사용할 파동함수(실제 파동함수 아님..)
The first is the wave function to use for particles.
워터플랜(표면)에 사용할 물 재질
The second is the material used for the water plane.
- particle material
일단 1개의 파동을 제작합니다.(실제론 건너뛰어도됩니다)
step 1 create single wave material(it just example not used in project)


위에 단일 파동노드를 이용해서 실제 게임에 사용할 물결용 노드와 파티클 파라메터등을 연결해서 최종적인 머터리얼을 만들어줍니다.
Use the single wave web to creating multi wave and connected to particle parameter for material
다른 뷰티적인부분은 제외하고 현재 보이는 부분이 테셀레이션과 연결됩니다.
This node will conneted to materials tesselation input


Step 2 waterplane material
렌더 타겟의 채널을 이용해 웨이브의 종류를 3개까지 선택할 수 있습니다. (파티클에서 최종컬러를 지정하면 지정된 컬러에 해당하는 채널에 저장됩니다)
We useable 3kinds wave to through rendertarget's channel(RGB)(color of particle's final color)
이미지에서는 2개의 채널을 사용하고 있습니다.
각 채널은 위에서 만든 파동형태를 갖고있는 파티클들을 한장의 이미지로 캡쳐해내며 그 텍스쳐를 베이스로 물의 표면을 만들어 냅니다.
Each channel captures the particles that have the wave shape created above as a single image and creates the surface of the water based on the texture.
머터리얼에 보이는 다른 노드들은 뷰티를 위한(물처럼 보이기위한)노드들이며 물 파장등에는 영향을 주지 않습니다.
Another node is beauty node

다음 이미지는 위에 함수화되어있는 월드 프로젝션 uv를 나타냅니다.
It is world projection uv function
간단한 내용이며 mpc를 동해 블루프린트에서 값을 전달 받습니다.
Passed by mpc in blueprint

이렇게 게임시스템에서 넘겨준 포지션을 통해
각 케릭터의 위치에 파티클을 '뿌려주거나 지우거나 이동시켜주거나' 등을 하고
그 파티클을 찍어서 메쉬표면 머터리얼에 전달해서 물 표면을 제작하게됩니다.
It is all of our interactive surface ,
this core is useful for express any surface visual event
'unreal > Unreal ETC' 카테고리의 다른 글
| Unreal_5.44 안드로이드 vulkan 모바일에 렌더독붙이기 (0) | 2026.01.20 |
|---|---|
| [Unreal_Editor] 에디터 블루프린트 바로가기 버튼 추가 (0) | 2025.02.25 |
| [Unreal]언리얼 그래픽 옵션 제작 Game Graphic Option (1) | 2020.07.29 |